Set up SSO with Microsoft Entra ID (formerly Azure AD)
This guide describes a feature of the dbt Cloud Enterprise plan. If you’re interested in learning more about an Enterprise plan, contact us at sales@getdbt.com.
These SSO configuration documents apply to multi-tenant Enterprise deployments only.
dbt Cloud Enterprise supports single-sign on via Microsoft Entra ID (formerly Azure AD). You will need permissions to create and manage a new Entra ID application. Currently supported features include:
- IdP-initiated SSO
- SP-initiated SSO
- Just-in-time provisioning
Configuration
dbt Cloud supports both single tenant and multi-tenant Microsoft Entra ID (formerly Azure AD) SSO Connections. For most Enterprise purposes, you will want to use the single-tenant flow when creating a Microsoft Entra ID Application.
Creating an application
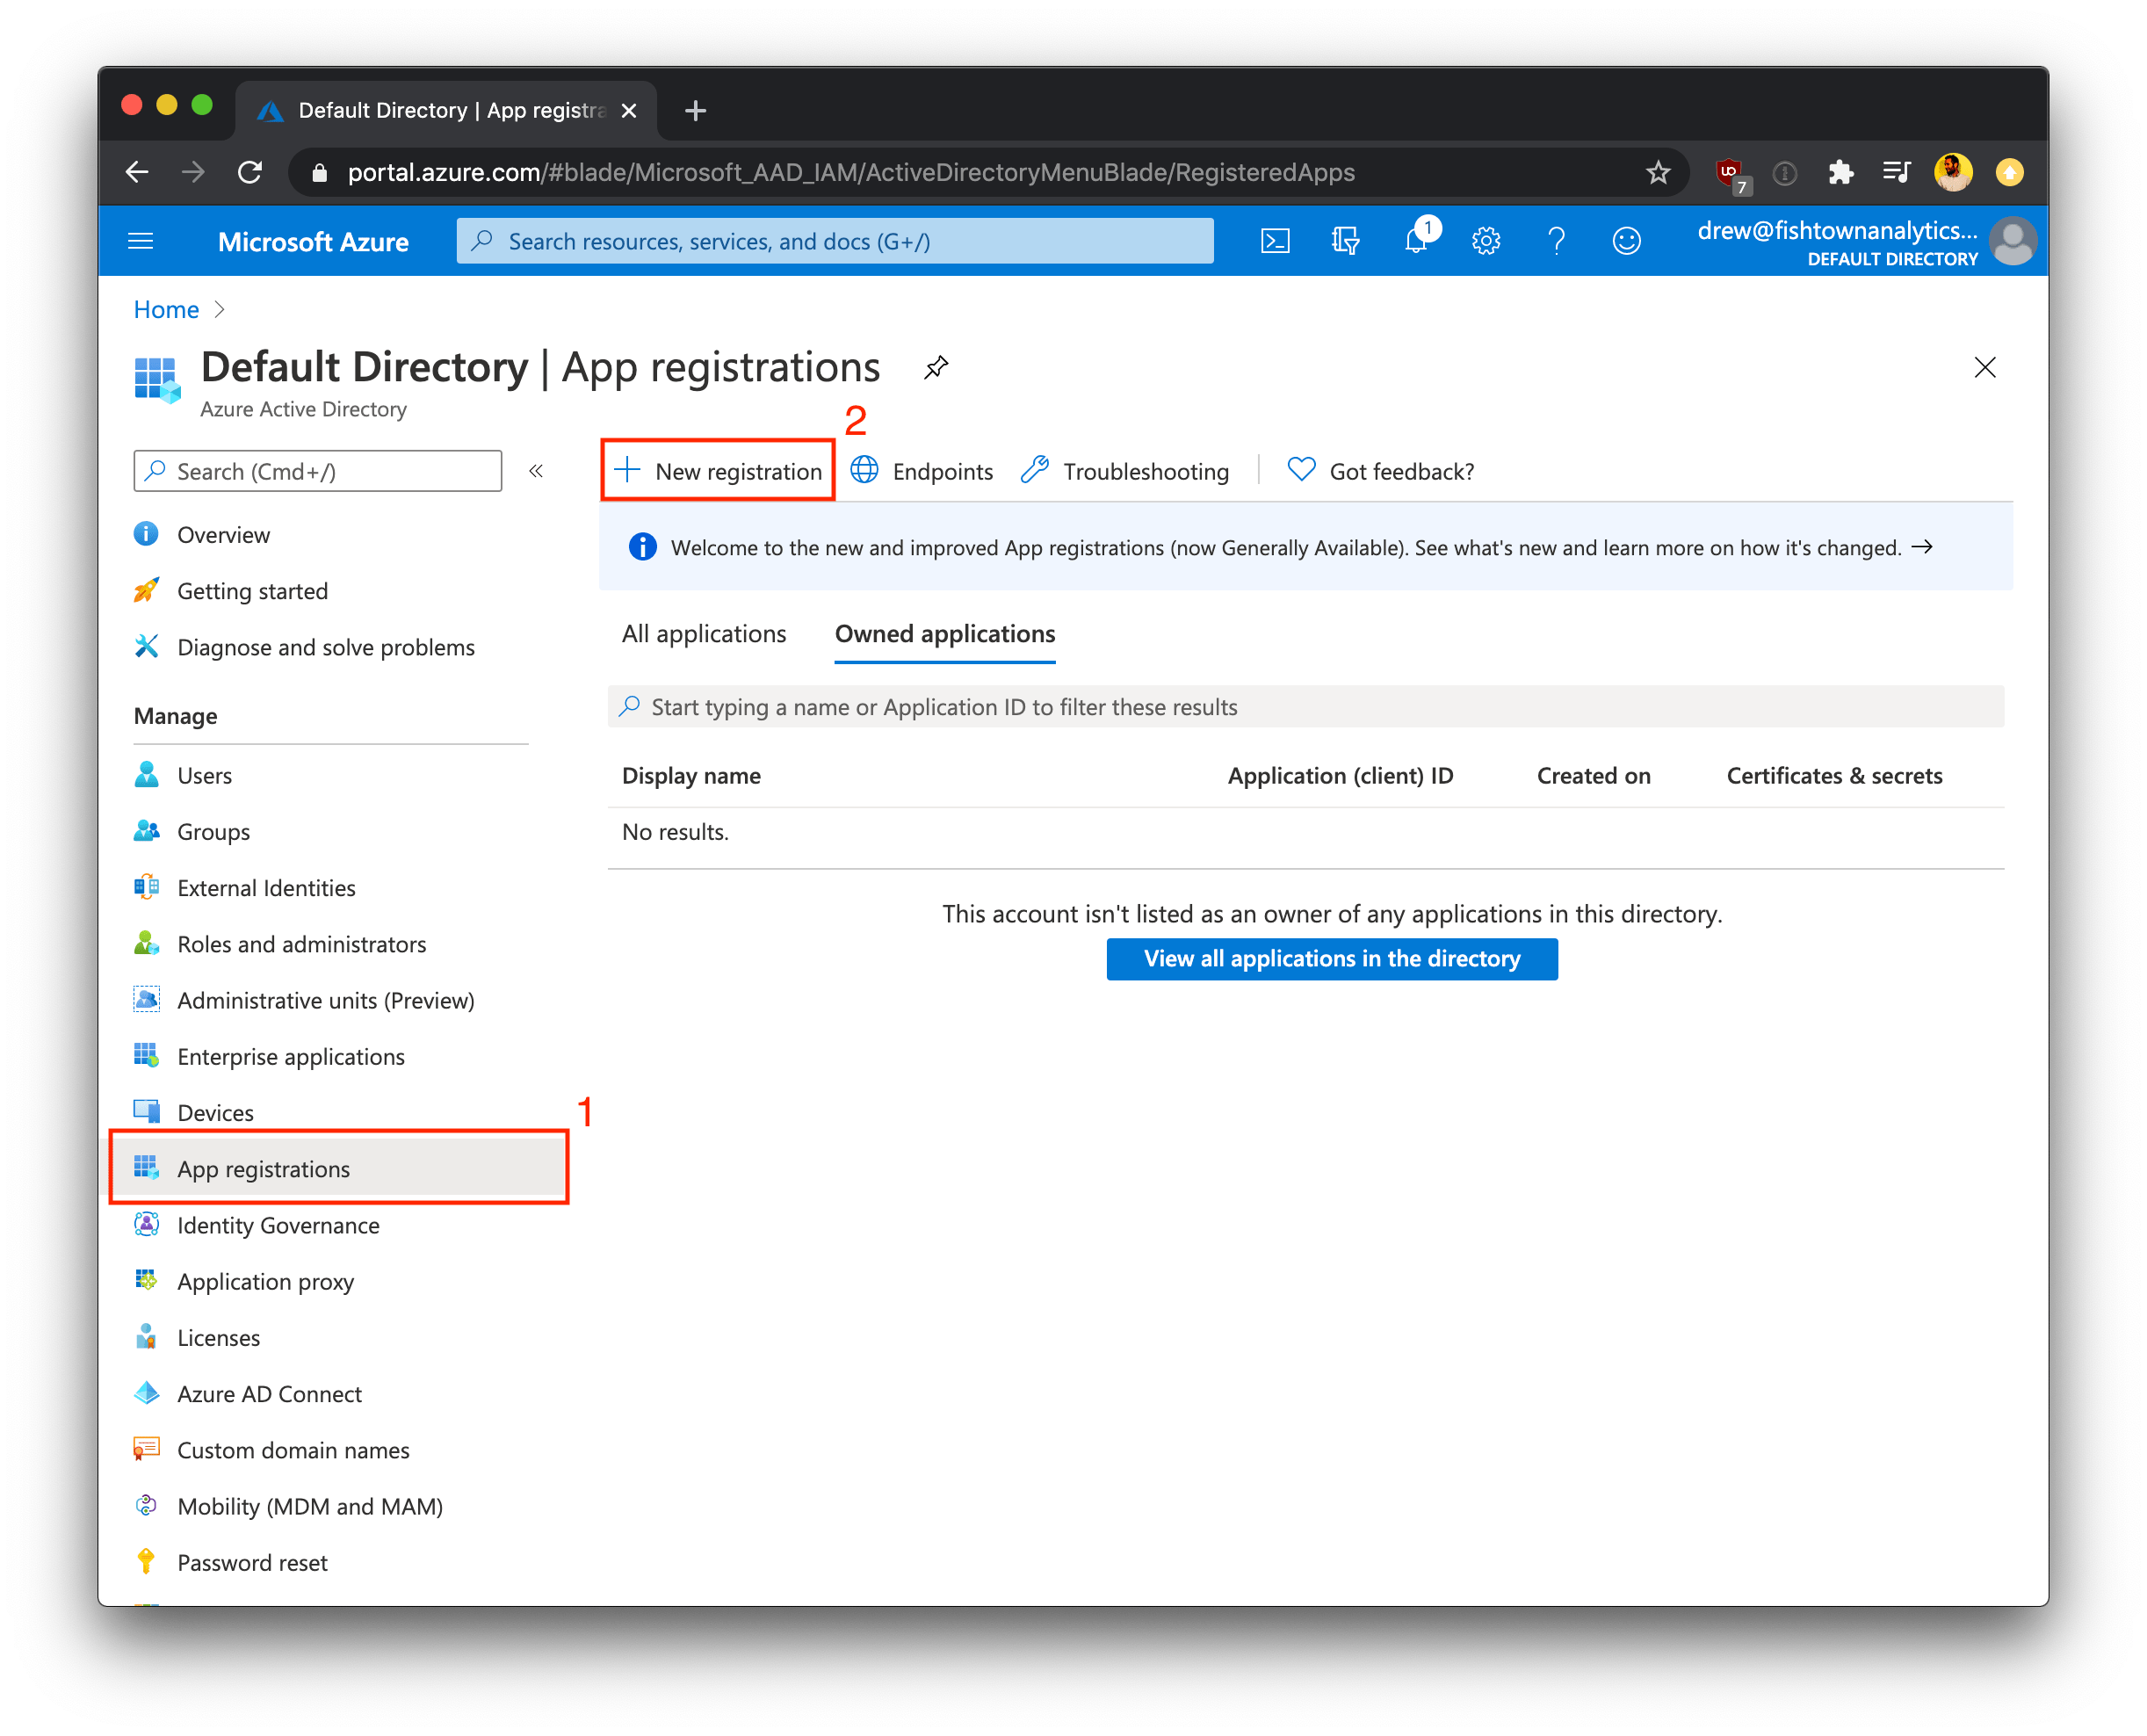
Log into the Azure portal for your organization. Using the Microsoft Entra ID page, you will need to select the appropriate directory and then register a new application.
- Under Manage, select App registrations.
- Click + New Registration to begin creating a new application registration.
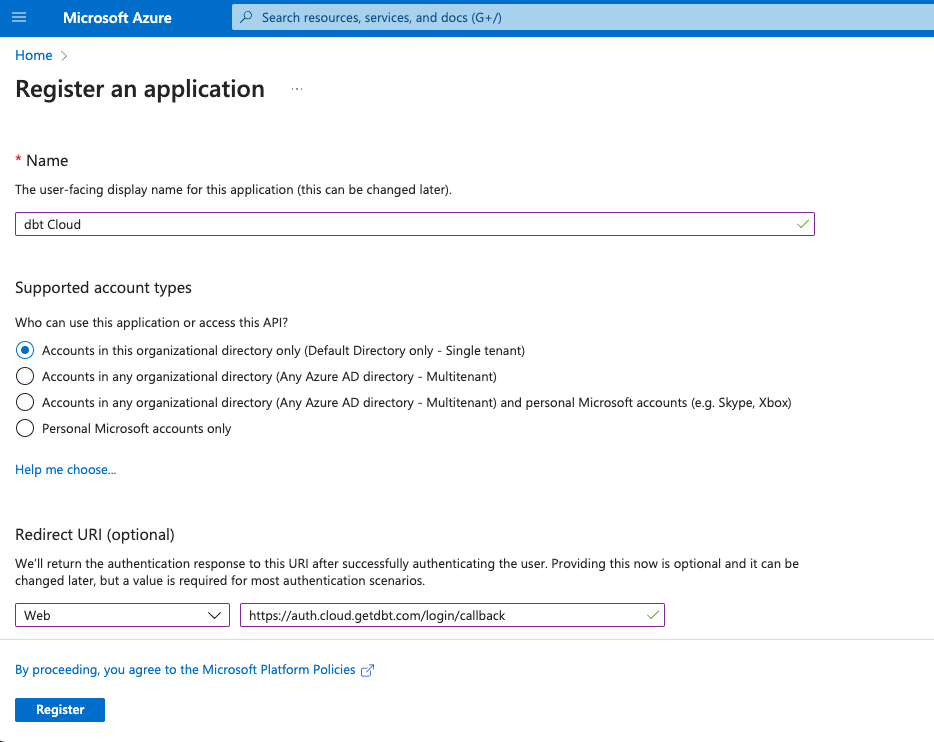
- Supply configurations for the Name and Supported account types fields as shown in the following table:
| Field | Value |
|---|---|
| Name | dbt Cloud |
| Supported account types | Accounts in this organizational directory only (single tenant) |
- Configure the Redirect URI. The table below shows the appropriate Redirect URI values for single-tenant and multi-tenant deployments. For most enterprise use-cases, you will want to use the single-tenant Redirect URI. Replace
YOUR_AUTH0_URIwith the appropriate Auth0 URI for your region and plan.
| Application Type | Redirect URI |
|---|---|
| Single-tenant (recommended) | https://YOUR_AUTH0_URI/login/callback |
| Multi-tenant | https://YOUR_AUTH0_URI/login/callback |
- Save the App registration to continue setting up Microsoft Entra ID SSO
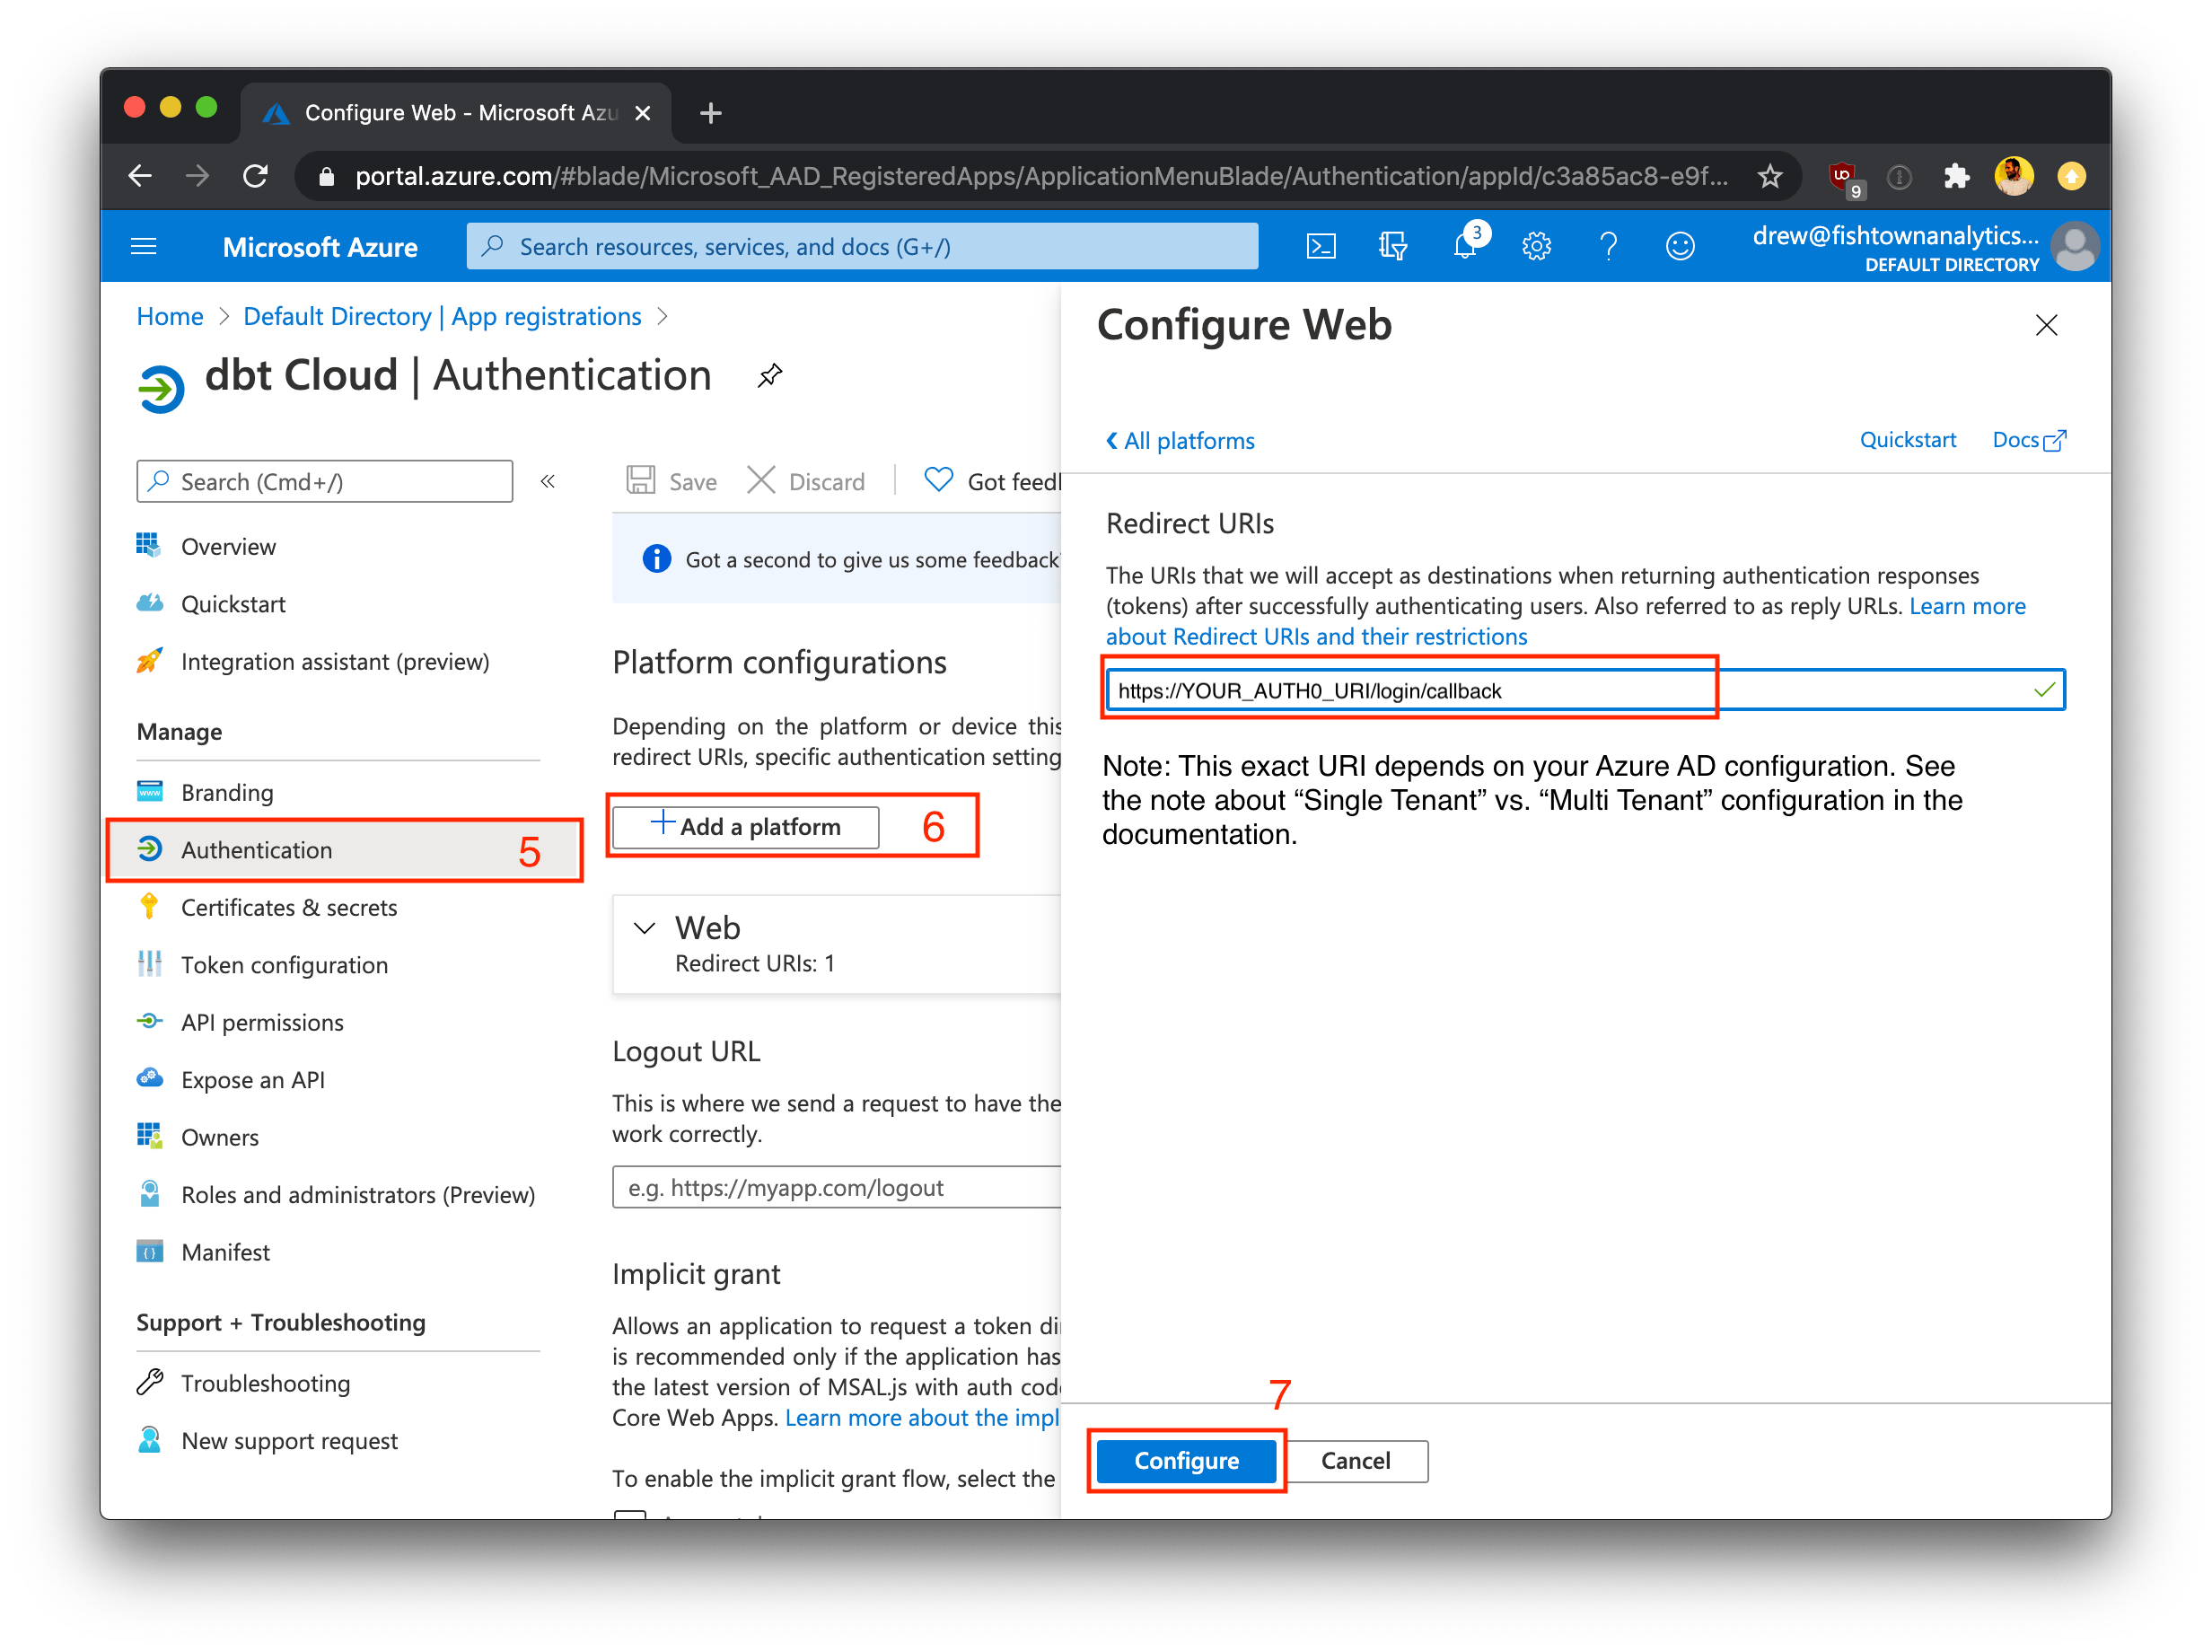
Depending on your Microsoft Entra ID settings, your App Registration page might look different than the screenshots shown earlier. If you are not prompted to configure a Redirect URI on the New Registration page, then follow steps 6 - 7 below after creating your App Registration. If you were able to set up the Redirect URI in the steps above, then skip ahead to step 8.
-
After registering the new application without specifying a Redirect URI, click on App registration and then navigate to the Authentication tab for the new application.
-
Click + Add platform and enter a Redirect URI for your application. See step 4 above for more information on the correct Redirect URI value for your dbt Cloud application.
Azure <-> dbt Cloud User and Group mapping
The Azure users and groups you will create in the following steps are mapped to groups created in dbt Cloud based on the group name. Reference the docs on enterprise permissions for additional information on how users, groups, and permission sets are configured in dbt Cloud.
Adding users to an Enterprise application
Once you've registered the application, the next step is to assign users to it. Add the users you want to be viewable to dbt with the following steps:
- Navigate back to the Default Directory (or Home) and click Enterprise Applications
- Click the name of the application you created earlier
- Click Assign Users and Groups
- Click Add User/Group
- Assign additional users and groups as-needed
Under Properties check the toggle setting for User assignment required? and confirm it aligns to your requirements. Most customers will want this toggled to Yes so that only users/groups explicitly assigned to dbt Cloud will be able to sign in. If this setting is toggled to No any user will be able to access the application if they have a direct link to the application per Microsoft Entra ID Documentation
Configuring permissions
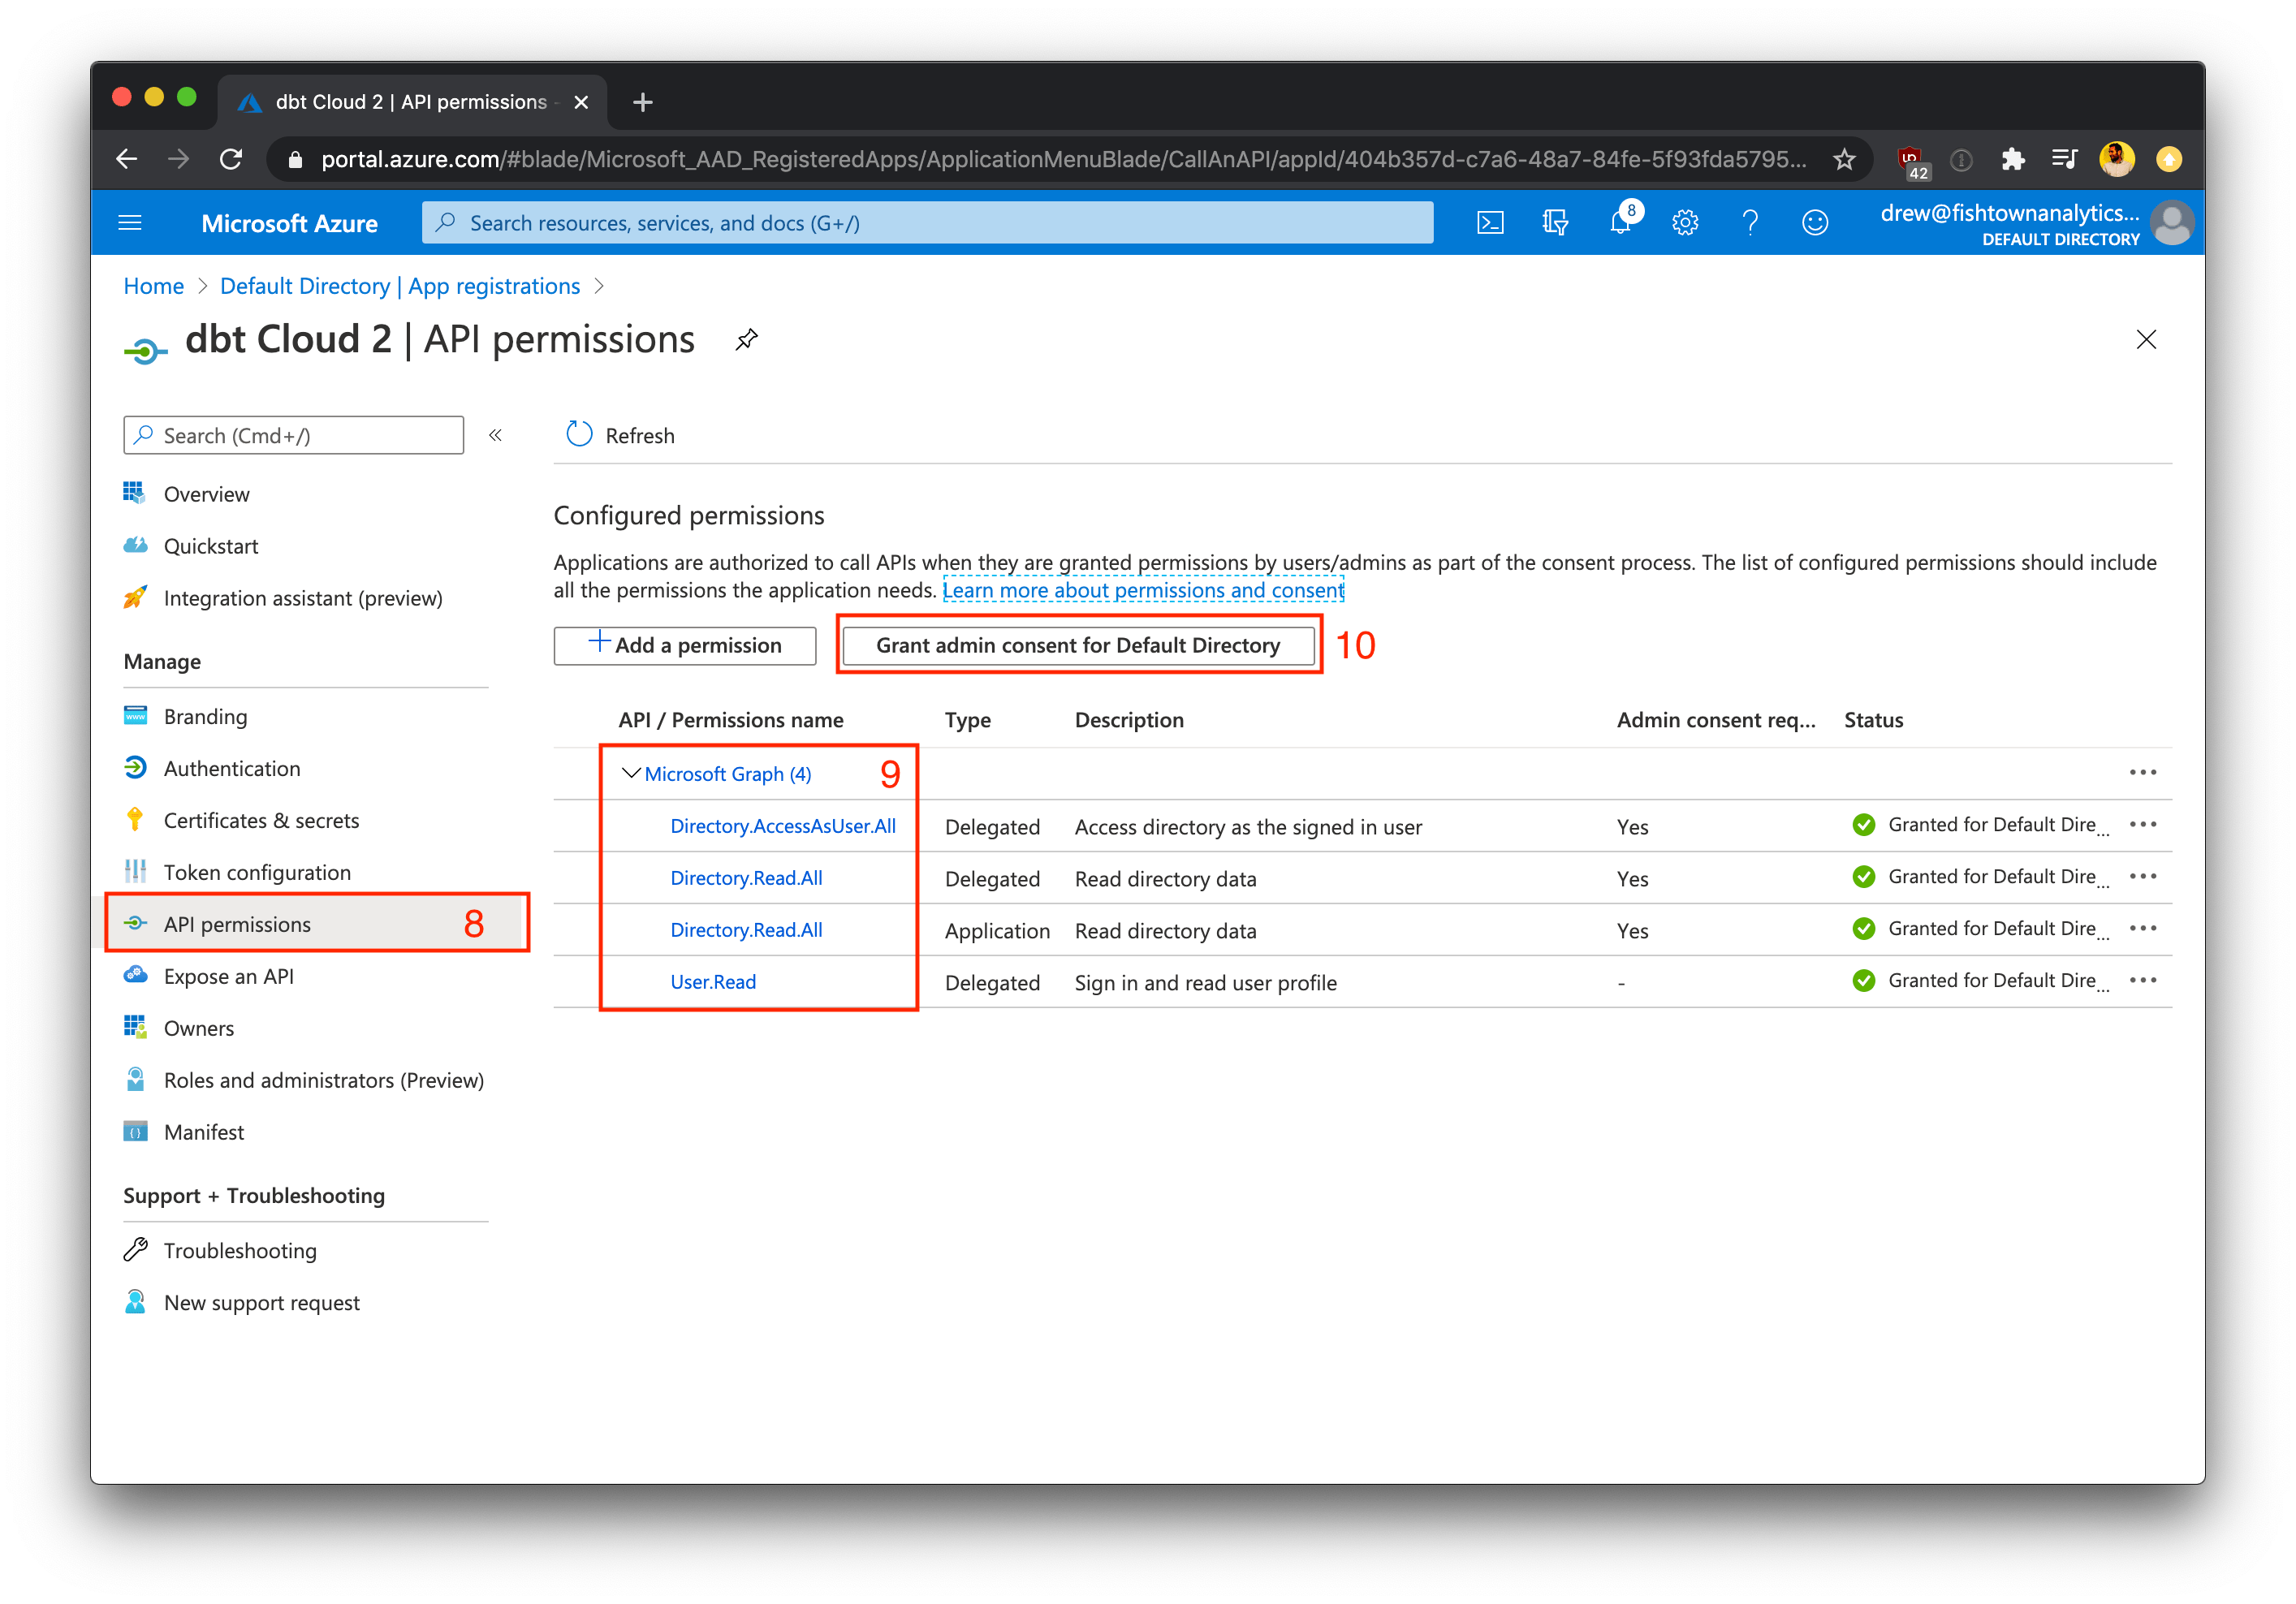
- Navigate back to Default Directory (or Home) and then App registration.
- Select your application and then select API Permissions
- Click +Add a permission and add the permissions shown below
| API Name | Type | Permission |
|---|---|---|
| Microsoft Graph | Delegated | Directory.AccessAsUser.All |
| Microsoft Graph | Delegated | Directory.Read.All |
| Microsoft Graph | Delegated | User.Read |
- Save these permissions, then click Grant admin consent to grant admin consent for this directory on behalf of all of your users.
Creating a client secret
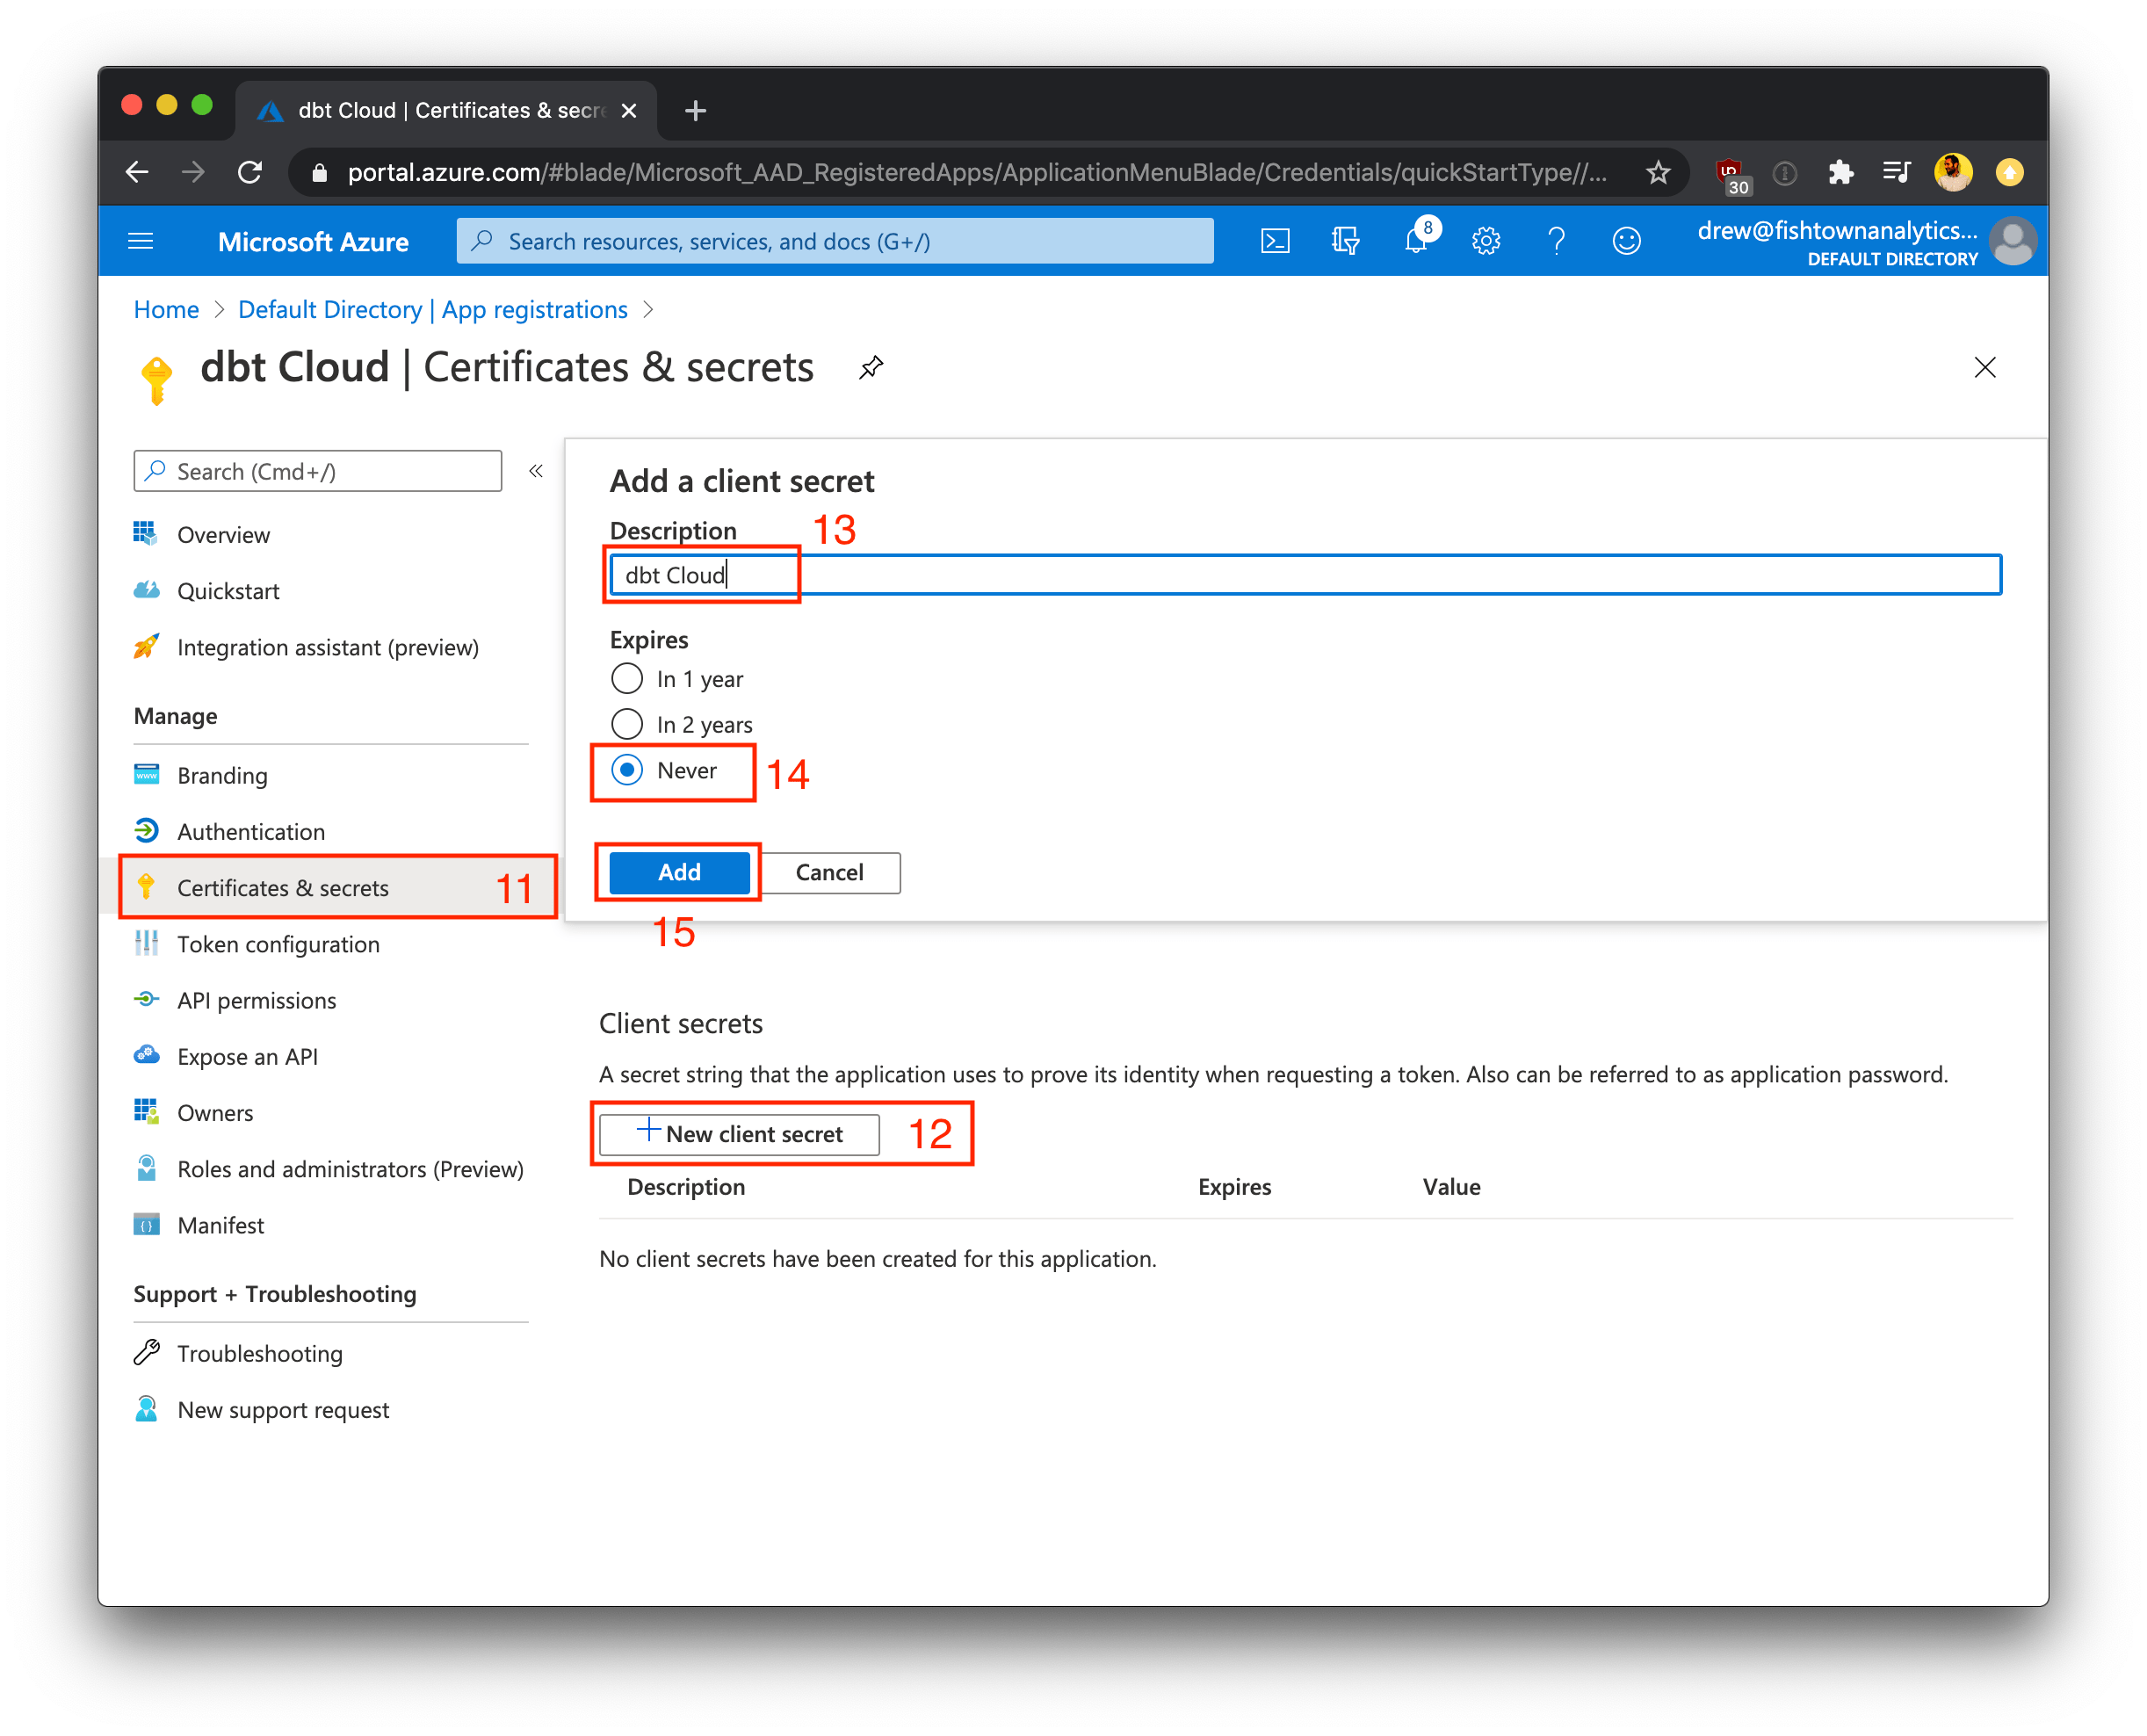
- Under Manage, click Certificates & secrets
- Click +New client secret
- Name the client secret "dbt Cloud" (or similar) to identify the secret
- Select 730 days (24 months) as the expiration value for this secret (recommended)
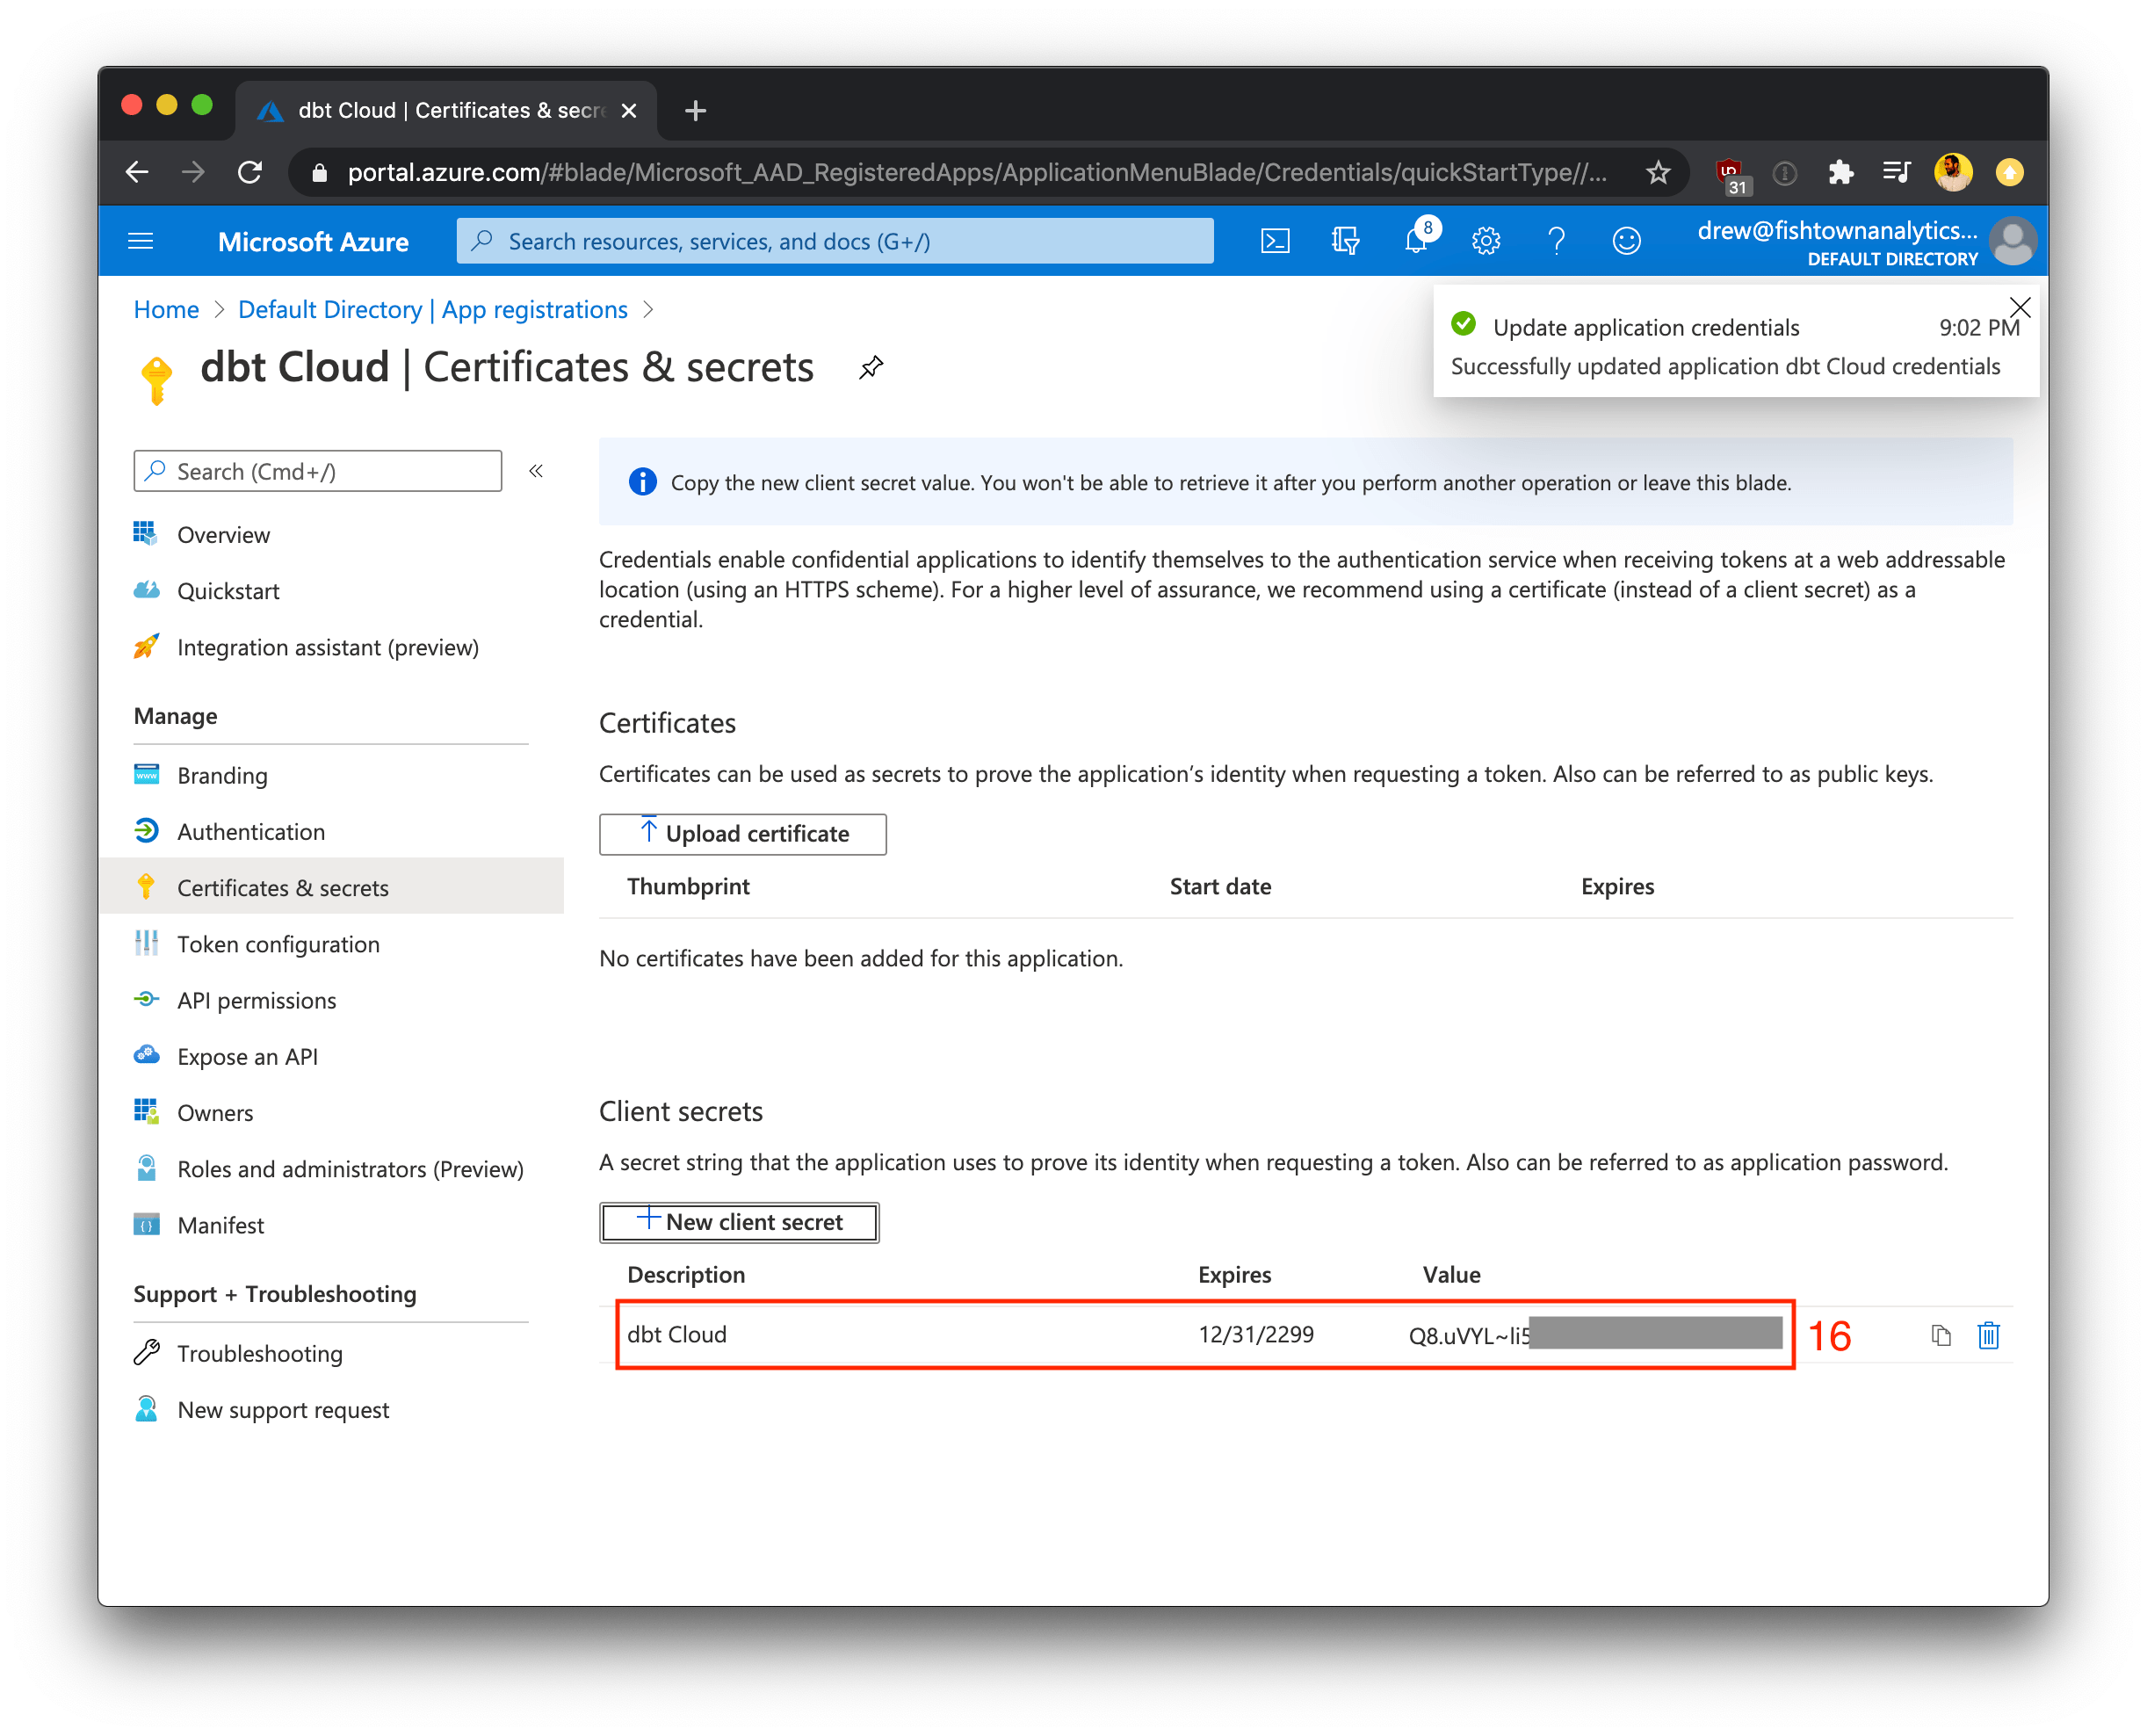
- Click Add to finish creating the client secret value (not the client secret ID)
- Record the generated client secret somewhere safe. Later in the setup process, we'll use this client secret in dbt Cloud to finish configuring the integration.
Collect client credentials
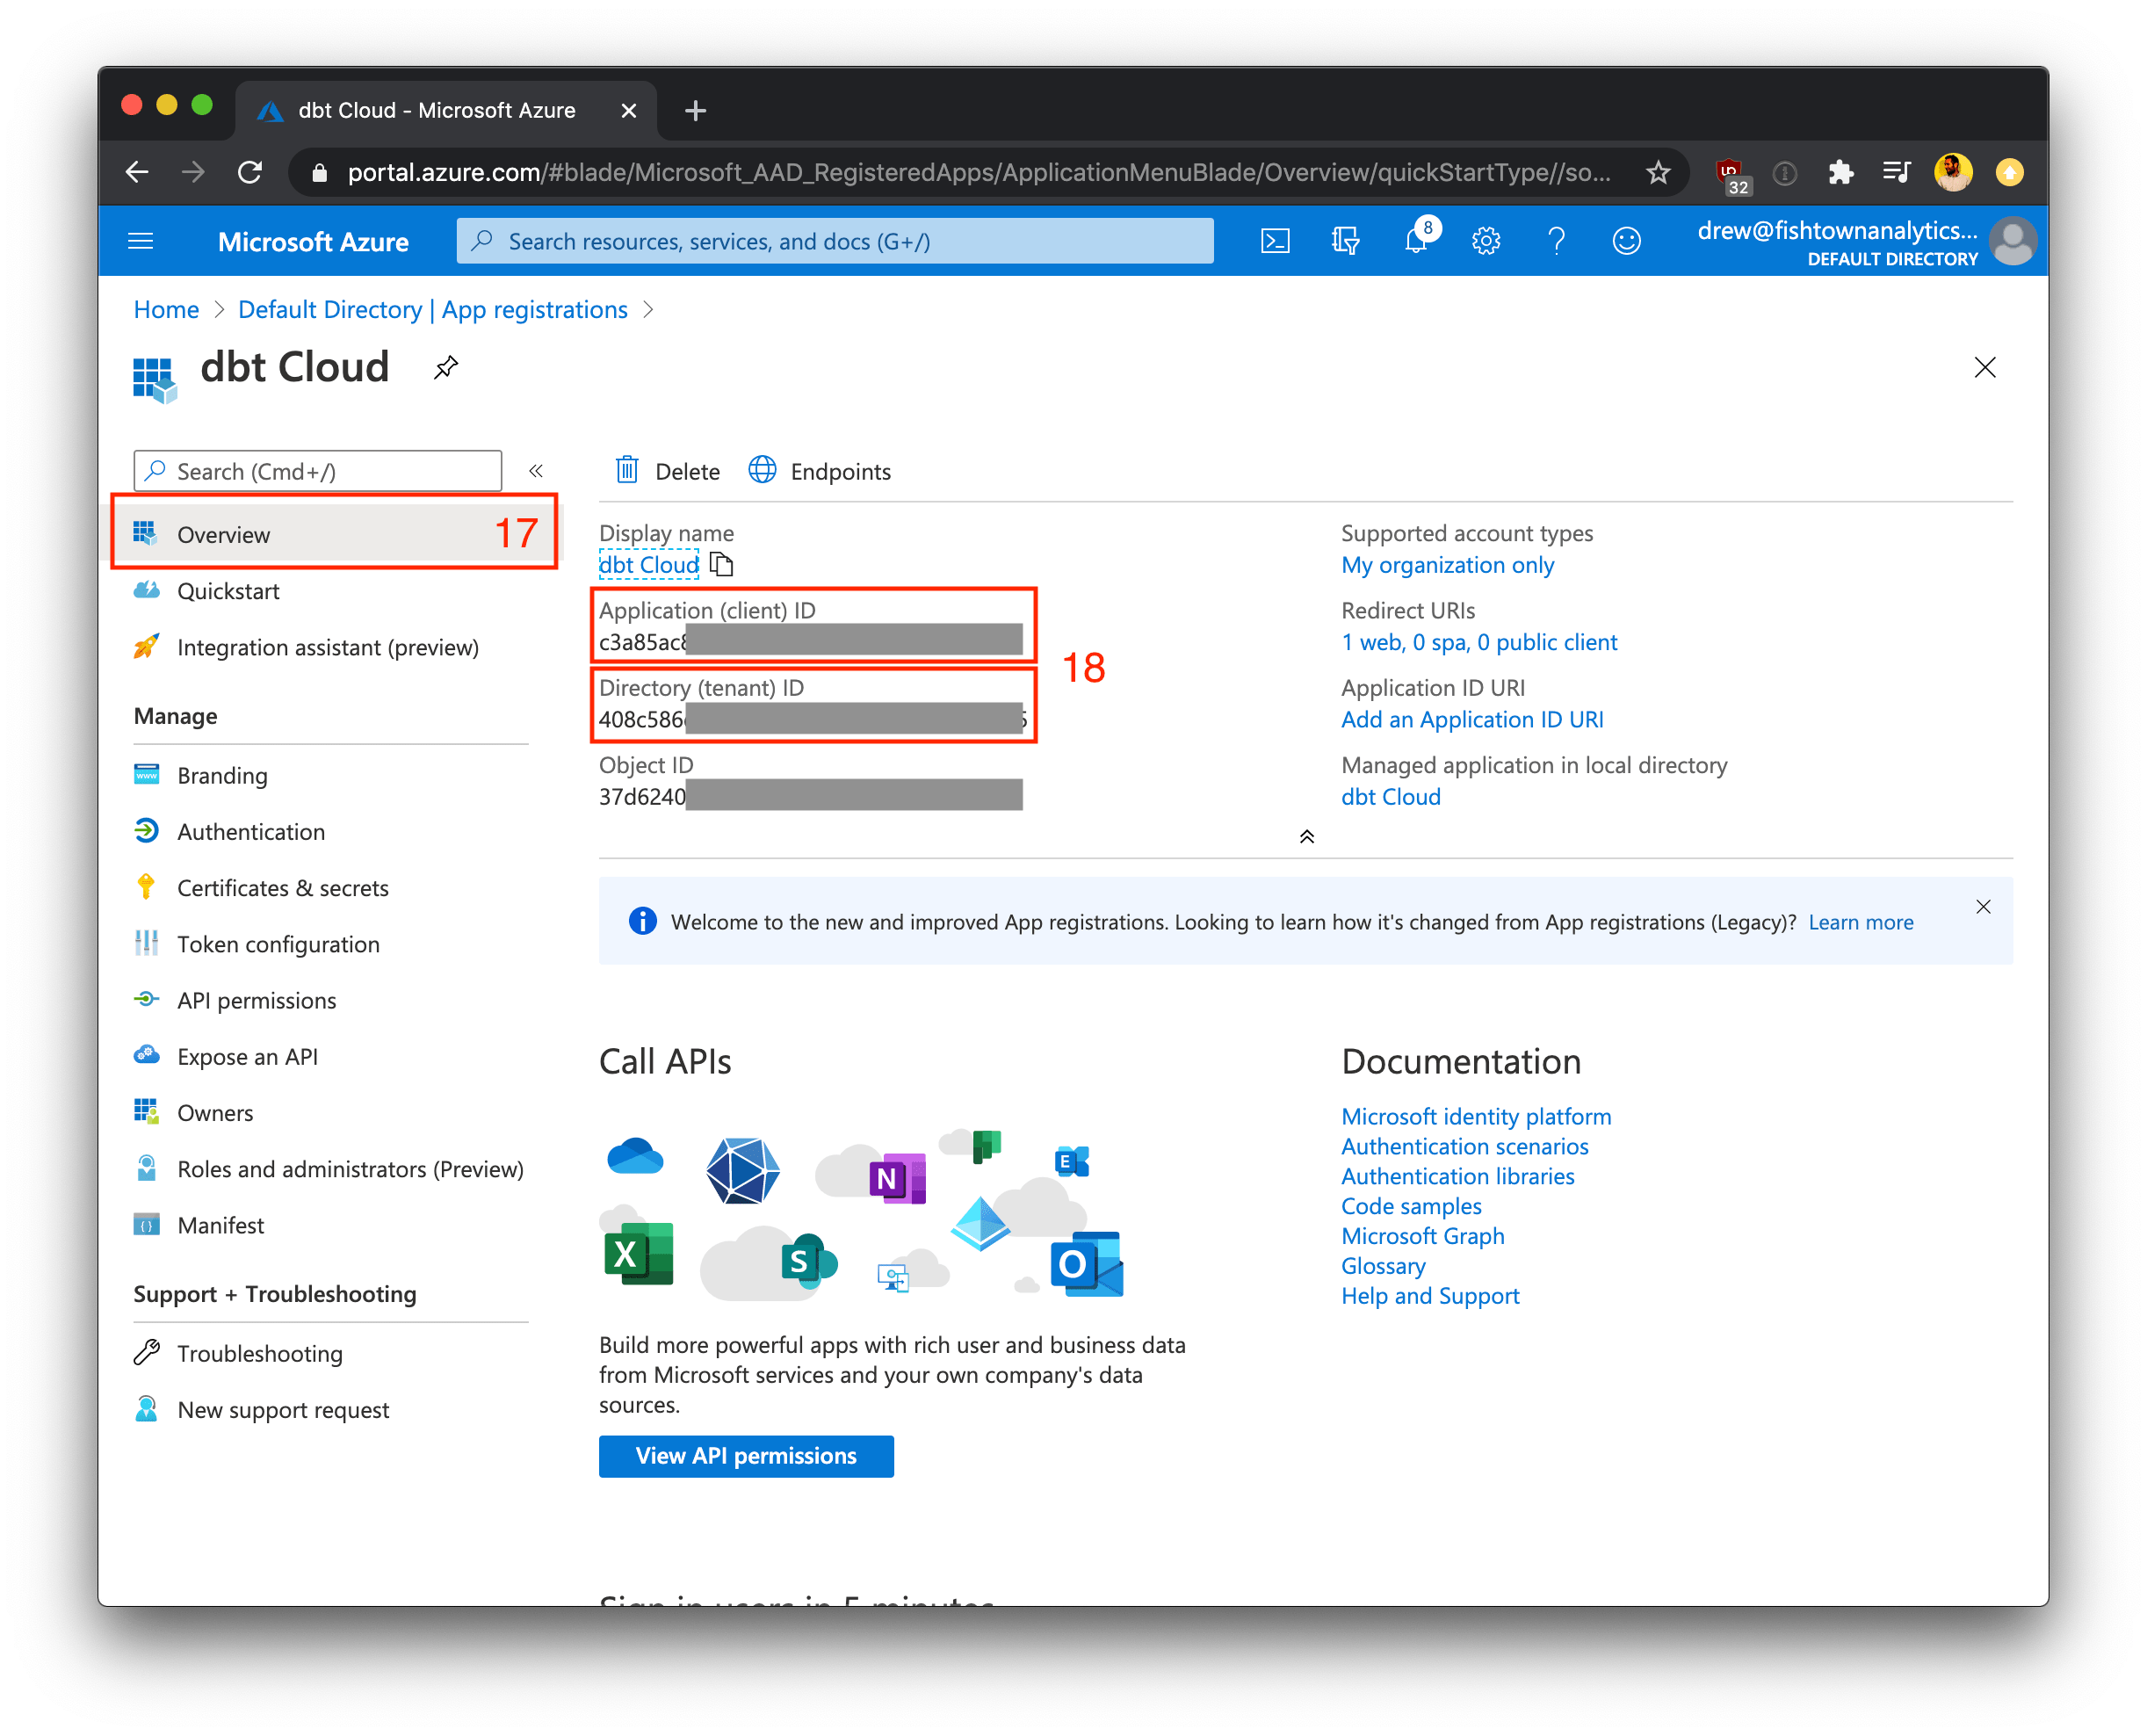
- Navigate to the Overview page for the app registration
- Note the Application (client) ID and Directory (tenant) ID shown in this form and record them along with your client secret. We'll use these keys in the steps below to finish configuring the integration in dbt Cloud.
Configuring dbt Cloud
To complete setup, follow the steps below in the dbt Cloud application.
Supplying credentials
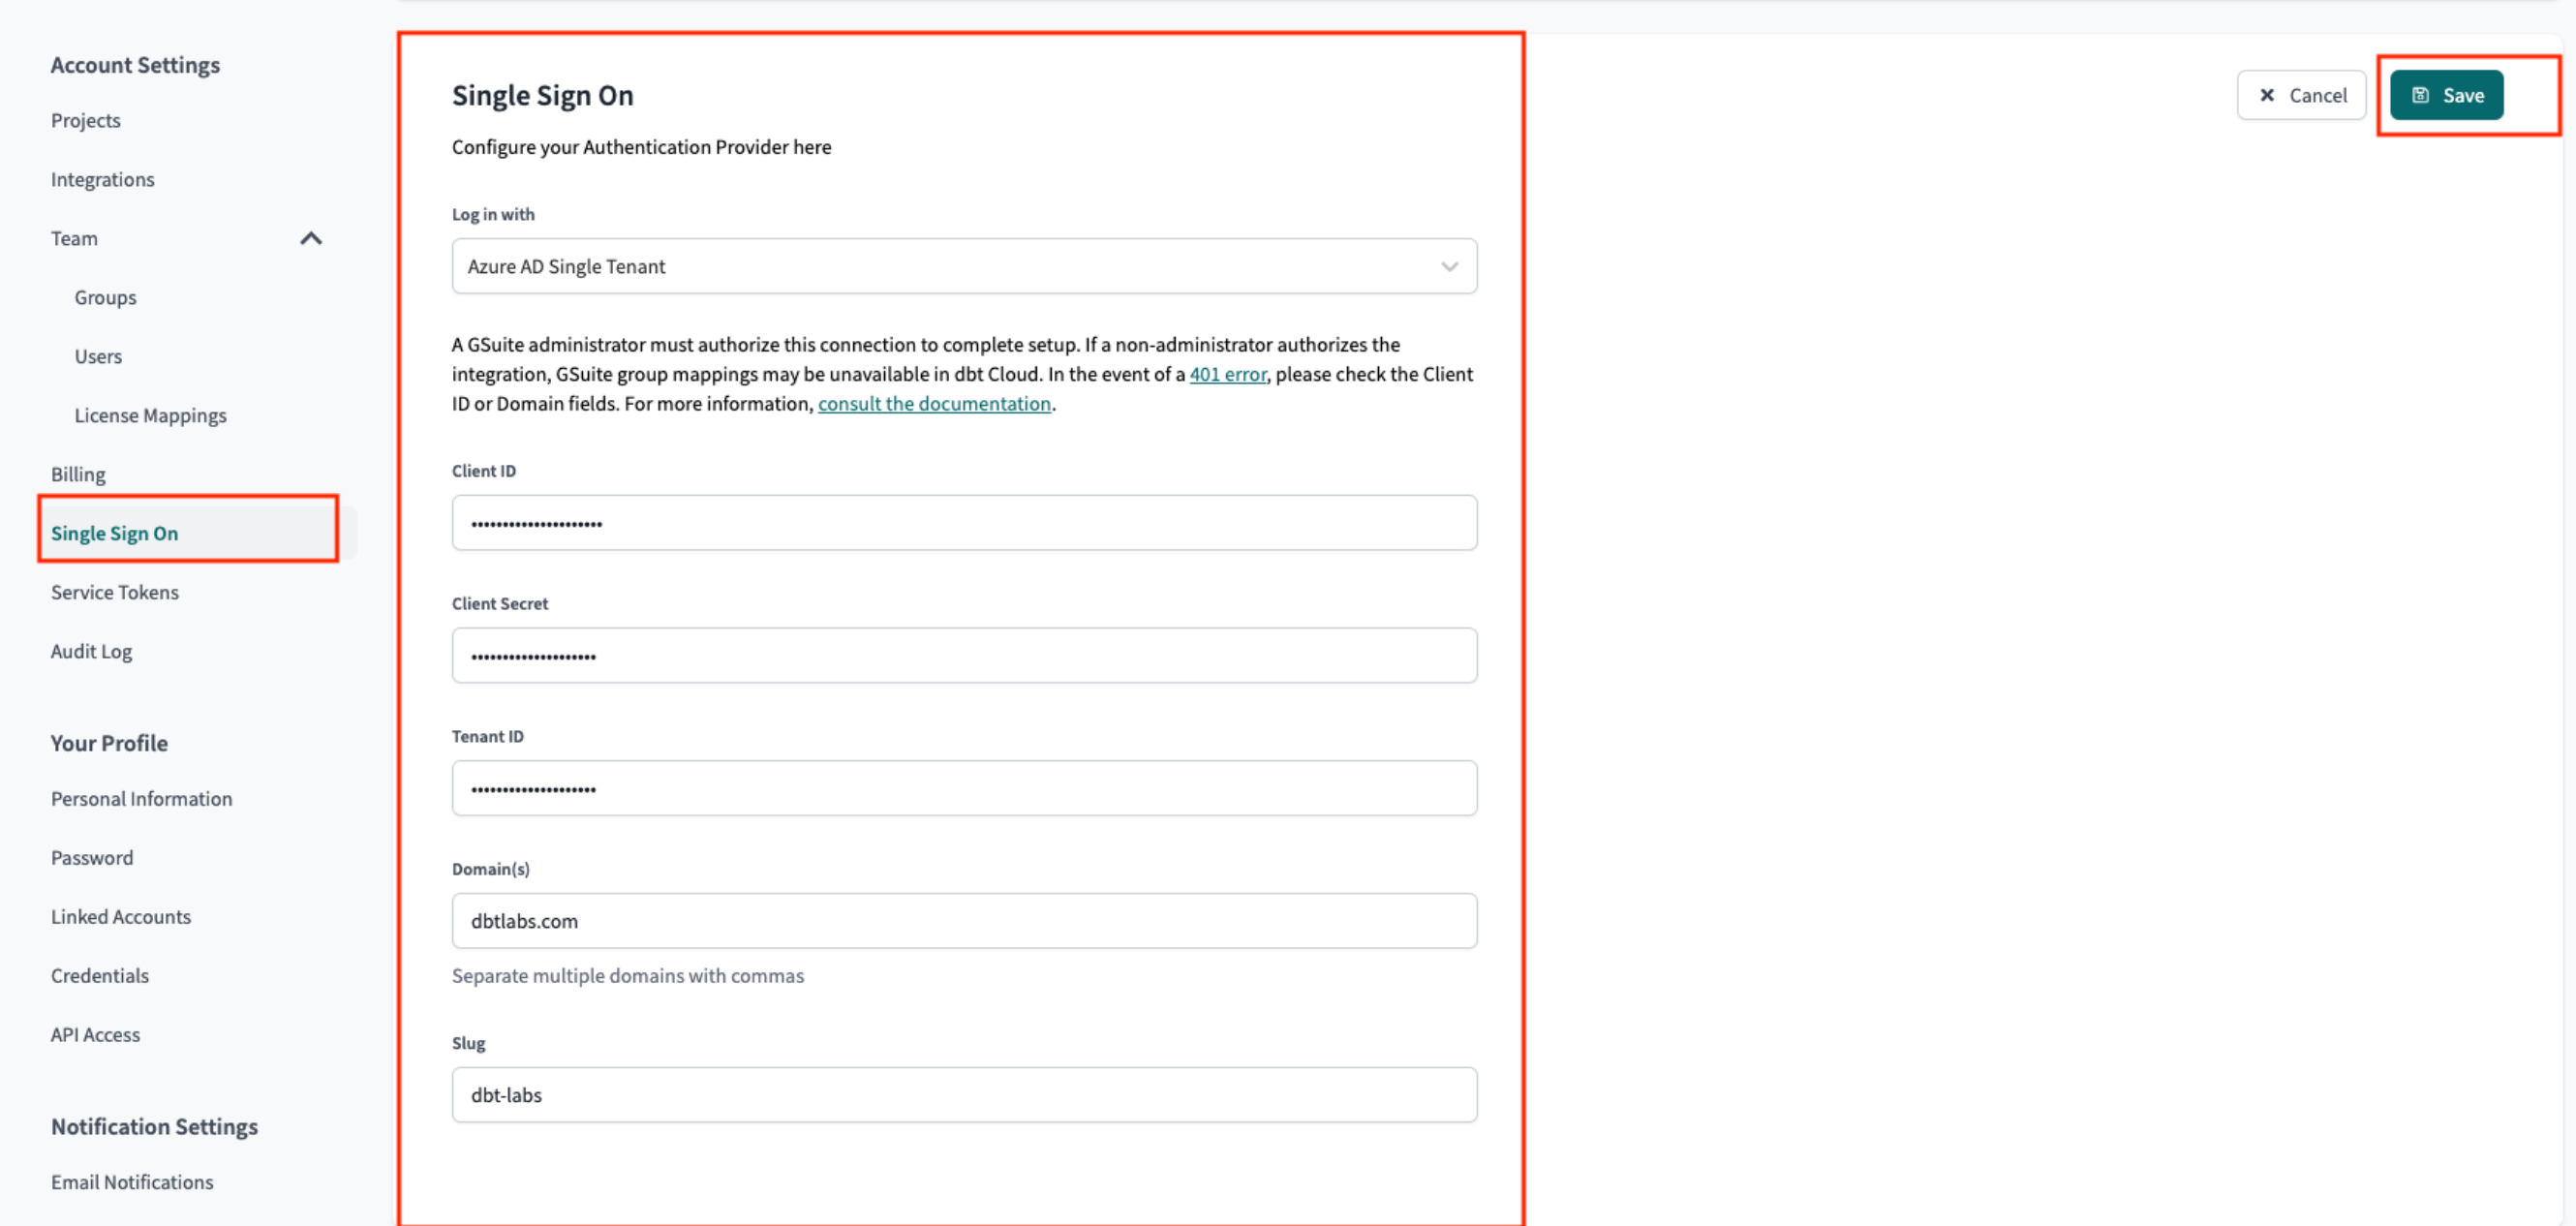
- From dbt Cloud, click on your account name in the left side menu and select Account settings.
- Click Single sign-on from the menu.
- Click the Edit button and supply the following SSO details:
| Field | Value |
|---|---|
| Log in with | Microsoft Entra ID Single Tenant |
| Client ID | Paste the Application (client) ID recorded in the steps above |
| Client Secret | Paste the Client Secret (remember to use the Secret Value instead of the Secret ID) from the steps above; Note: When the client secret expires, an Entra ID admin will have to generate a new one to be pasted into dbt Cloud for uninterrupted application access. |
| Tenant ID | Paste the Directory (tenant ID) recorded in the steps above |
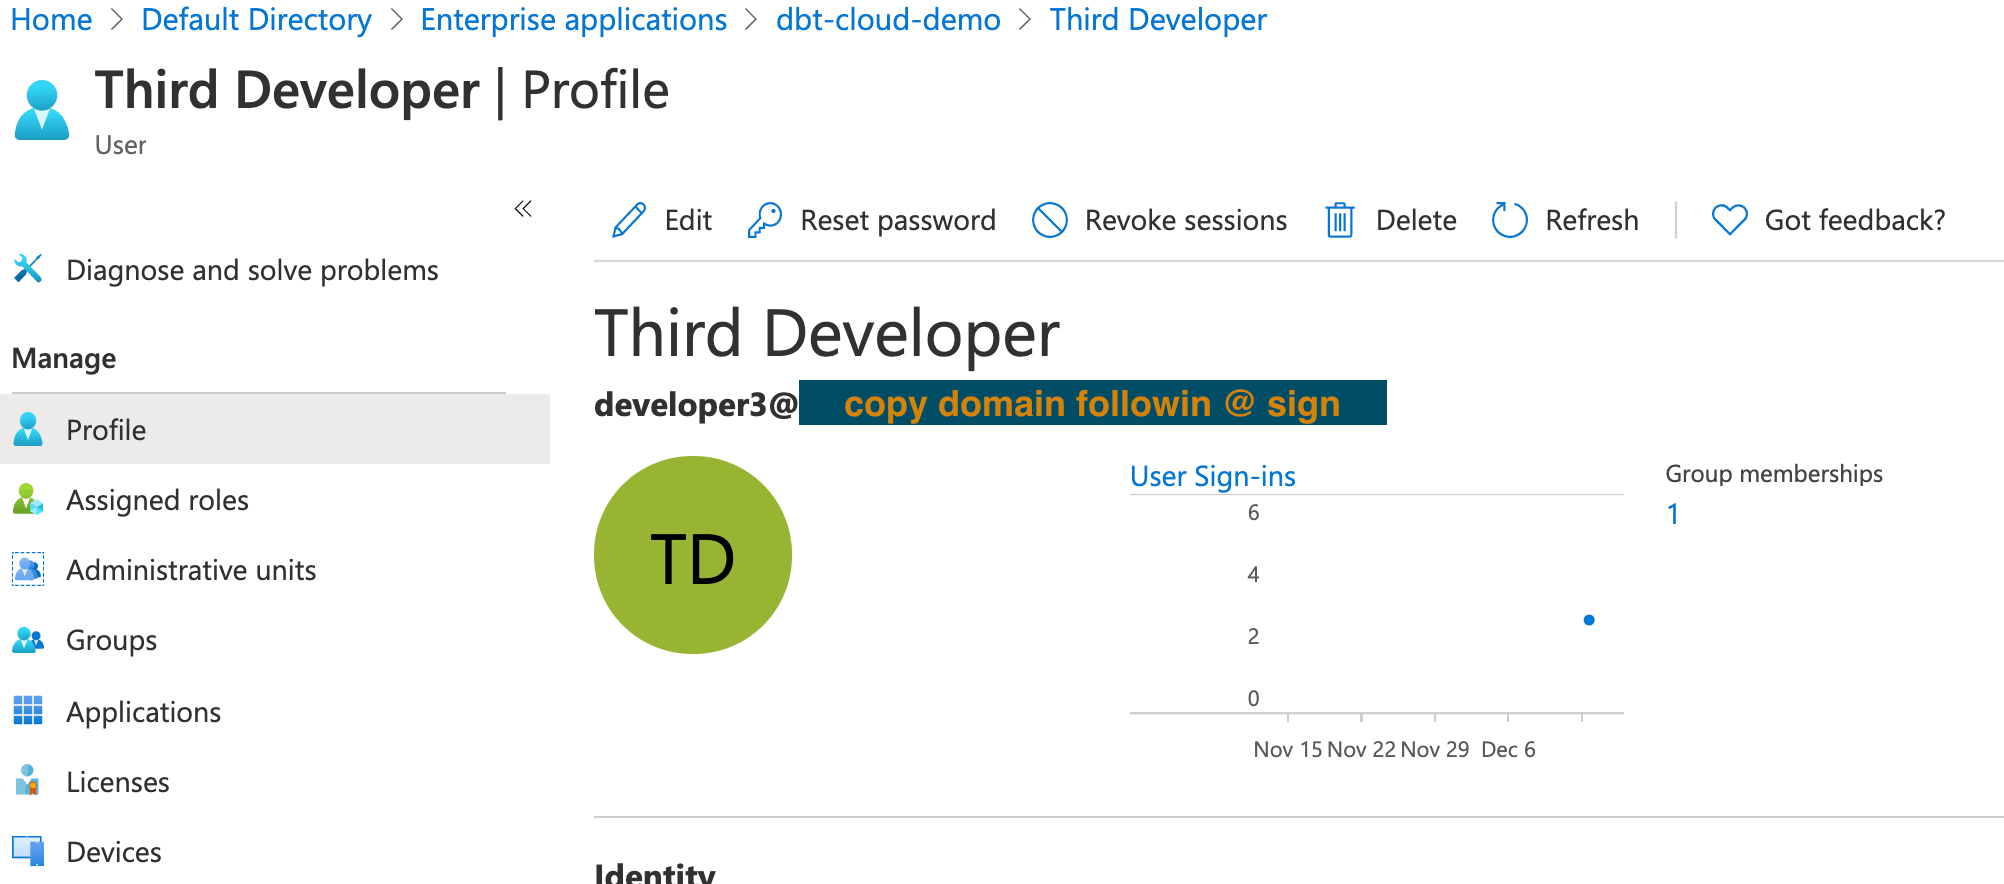
| Domain | Enter the domain name for your Azure directory (such as fishtownanalytics.com). Only use the primary domain; this won't block access for other domains. |
| Slug | Enter your desired login slug. Users will be able to log into dbt Cloud by navigating to https://YOUR_ACCESS_URL/enterprise-login/LOGIN-SLUG, replacing YOUR_ACCESS_URL with the appropriate Access URL for your region and plan. Login slugs must be unique across all dbt Cloud accounts, so pick a slug that uniquely identifies your company. |
- Click Save to complete setup for the Microsoft Entra ID SSO integration. From here, you can navigate to the login URL generated for your account's slug to test logging in with Entra ID.
Users can now log into the dbt Cloud by navigating to the following URL, replacing LOGIN-SLUG with the value used in the previous steps and YOUR_ACCESS_URL with the appropriate Access URL for your region and plan:
https://YOUR_ACCESS_URL/enterprise-login/LOGIN-SLUG
Setting up RBAC
Now you have completed setting up SSO with Entra ID, the next steps will be to set up RBAC groups to complete your access control configuration.
Troubleshooting Tips
Ensure that the domain name under which user accounts exist in Azure matches the domain you supplied in Supplying credentials when you configured SSO.
